I talked, not long ago, about the process of strumming chords on a guitar. That post focused on what the right hand does while playing the instrument (presuming the player is right handed.) Let’s consider the what the left hand does while fretting different chord shapes. We’ll focus on what are called open chords.
Open chords are popular shapes that involve fretting some notes on the instrument, while leaving some strings open (e.g. not fretted.) The result is a nice mix of ringing open strings and less ringing fretted notes. With a handful of these standard open chords players can play zillions of popular songs*
*To do this you may need to change the key of the original recording of the song to one more convenient to open chords. G, C, Ami, Emi and D are all great open chord keys. Eb and Bb not so much.
Diagrams for open chords can be found all over the web and I’ll include some here. Mainly, what I want to do here is provide some methods for quickly learning any chord shape.
The C Major Chord
What do we need to be aware of when learning a new chord? First,we need to know what notes on the instrument need to be fretted. Secondly, we need to know what fingers we use to fret those notes. Let’s consider this diagram and photo of a C major chord.
C Major Chord


(For all diagrams, 1 = index finger, 2 = middle finger, 3 = ring finger and 4 = pinky.)
As we can see (Or should I say “C”? No, I really shouldn’t.) we use our ring finger to fret the 5th string/3rd fret, we use our middle finger to fret the 4th string/2nd fret and we use our 1st finger to fret the 2nd string/1st fret. The 3rd string and and 1st string are played open. Note the X on the sixth string in the diagram. This tells us we shouldn’t hit this string when we strum (though it won’t sound awful if you do.)
That’s the big picture. What we want to do is be able to quickly “grab” this chord without having to constantly think through the steps described in the preceding paragraph. How do we make this process more automatic?
Chunking
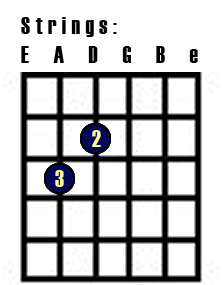
As with many things in life, it’s best to break complex actions down into small chunks. Once we’ve mastered those chunks we can combine them into a whole. What are the “chunks” of the C chord shape?
The actions of the ring and middle finger tend to make a nice little chunk. Try this process. Start with your fretting hand away from the guitar. Then reach for just the parts of this little chunk of the C chord (diagramed below.) Then take your hand off the guitar. Then reach for it again. Repeat this process several times. It may take a while but you’ll get better at it. (By the way, even just playing this chunk of the C chord results in a nice chord called a C Major 7th. Try it out.)
C Major chord chunk
Once you get a little comfortable with that, try adding in the additional chunk, the index finger fretting on the 2nd string/1st fret. Your thought process could be something like “First I reach for that first chunk on the lower strings, then I reach for that note with the index finger.) And, again, take your hands off the guitar, then reach for the full chord, then take your hands off, then reach for the chord, wash, rinse, repeat as needed.
The D major Chord
Let’s try another chord, the D chord. This one can be tough for beginners but it’s a good one to learn as it’s used in tons of songs and has a very “guitaristic” sound. Here’s a diagram.
D major Chord


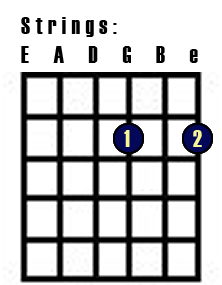
As you can see, the Xs tell us that we don’t strum the 6th or 5th string in this chord. (Hitting the 5th string won’t sound bad, actually, but the 6th string will be questionable.) We use our index finger to fret the 3rd string/2nd fret, we use our middle finger to fret the 1st string/2nd fret and we use our ring finger to fret the 2nd string/3rd fret. This is a tricky proposition at first; how can we break this into chunks?
I find reaching for the middle finger on the 1st string/2nd fret and the ring finger on the 2nd string/3rd fret is a good chunk. See the diagram below. Practice reaching for this chunk, then taking your hand away, then reaching for this chunk, etc. Practice this several times. (Remember, that index finger goes on the 3rd string/2nd fret; I often see people who are learning this chord wanting to use another finger.)
D major Chord Chunk
After you get comfortable with this we can add in the next chunk which is the ring finger on the 2nd string/3rd fret. Once again, take your hands of the guitar and reach for the shape, take your hands off, reach, repeat many times.
A note here: you’re not going to master these chord shapes in one session. But breaking things into chunks will allow you to systematically learn them and get them “wired” into your fingers.
The G major Chord
Let’s look at one more chord, the G chord. As the diagram below shows, we use our middle finger to fret the 6th string/3rd fret, our index finger to hit the 5th string second fret and our ring finger to hit the 1st string/3rd fret. All the other strings are played open. This chord has a nice, full, almost harp-like sound.
G major Chord


What are some good chunks to break this into? You can probably guess: we can think of the middle and index finger as one chunk. Practice reaching for this chunk, taking your hands away, then reaching again, etc.
After that, you can reach for the chunk and then add in that ring finger on the 1st string.
The G chord is an interesting one as you will probably come across slight variations of it involving using different fingers to fret certain notes. Personally, I think the one described above is the best but if you really feel more comfortable with a variation, go for it. Here’s a common alternate fingering.
G major Chord Alternate Fingering


Small Hands
A note for small hands. I sometimes have younger students who simply don’t have big enough hands to reach for all the notes in these chords, especially the G chord. No problem; hands grow. While waiting I simply have students work on the bigger chunks of each chords. (When strumming, they can either skip the strings with the missing chunks, or just hit them—in most cases they don’t sound bad.)
Additional Chord Shapes
Want to learn some more chord shapes? I recommend the fingerstofrets.com web site which shows the notes to fret and the fingers to use in a clear diagram for many useful chords. You can use the techniques listed here to break tricky ones into chunks and wire them into your fingers. Once you’ve learned the chords on that site it’s probably time for a good chord book.
Transitioning from one chord to another
Now, learning the shapes of the chords is half the battle. The next step learn is to transition between chords.

One thought on “Learning chord shapes on the guitar”